Showing posts with label DIY Decorating Projects. Show all posts

Friday, August 21, 2009

Show Us Your Life - Baby Showers

One of my favorite blogs to read is Kelly's Korner. Every Friday, she picks a theme or topic and asks all of her readers to show pictures of their life. I love going through some of the responses. They've done a home tour (which I vowed not to show too many pictures of our home)..and they've done wedding pictures (which I've already posted about)....so I've never participated.

This week's theme is baby showers. I've "co-hosted" several, but have only hosted one at my house, where I got to do all the decorations etc. I AM hosting another shower this fall and I can't wait! It's a co-ed shower and I've already got visions in my head on themes and table settings. I also think I'm going to use my new cake skills to make the cake myself! :)

Two years ago, I hosted a shower for my neighbor, (and good friend) Courtney who was having a boy. This was her second child and the shower was a total surprise!


The Diaper Cake


The Teddy Bear Display


The Cookies


The Tablescape

The Sign-In Table
I framed her invitation, had envelopes for the guests self-address their thank you cards, and then asks guests to write "tips" for the new mom of two!


Mimosa's and Champagne

I can't wait to host another this fall!

Monday, August 10, 2009

One person's trash.....

Is another person's treasure!!!!

A few weeks ago, our neighborhood had "Bulk Trash Pick-Up". You always know when it's about that time because you street starts to look a little 'WT'....if you catch my drift. You've got random refrigerators sitting by the curb....sinks.... ratty old couches etc. Occasionally, you will pass by something and think "I can't BELIEVE they are getting rid of that!".


Well friends. This time, I actually did something about it. On my way home from work, I was driving through our neighborhood and saw this chest of drawers sitting outside someones house. They were old..the back was falling off...cobb webs on the inside, but it was solid wood! Surely with a little TLC, I could make this a nice piece of furniture. SO...with James still at work, I loaded it into my car..by myself. I only WISH I had a picture of me doing this. It was SOO heavy. I don't know where I came up with the strength to do it, but if there is a will...there's a way!


As I was piling it into my car..not one, but TWO people drove by and said that they also saw this on their way home ...and they were coming back to pick this up! That's when I knew I wasn't crazy for doing this...and it was a steal!

I took it straight to Tiffany's house because I knew James wouldn't have the same "vision" as I did. He was heading out of town the following weekend, and I decided he didn't need to know ALL the details about my project. :)

So after one hot Sunday and $20 at Home Depot, it's finally finished!!! I have a brand new piece of furniture!! What do you think??


BEFORE & AFTER

NOTE: The "before" picture was after I gave it a good wipe down. I don't have a picture of what it looked like RIGHT off the street.

The project was super easy!


I gave it a good wipe down, sanded all surfaces, and took the hardware off the drawers.


I did two coats of Mirawax Gel Stain in Dark Walnut and then finished with a Mirawax polyurethane finishing coat.


The hardware gave me some issues. I first tried to "polish" them up with Tarnex to give them a good shine and remove the tarnish. I don't know what happened, but I think I completely stripped the bronze of their original finish. One turned pink and the other was just multi-colored. So...I went with a back-up plan....SPRAY PAINT!!!


TADA!!! The finished product! It didn't quite fit in our guest bedroom, but it was perfect for this little spot in our entry way. We had an old desk there that didn't go at all...not that a chest of drawers goes in a dining room, but it's much better!

So....what did I do with my new STORAGE???


ORGANIZE ALL MY WRAPPING PAPER SUPPLIES!! :)


Yes - I admit it. I'm a tissue paper saver AND gift bag re-user.

I can't tell you how much space this opened up in our study. The 4th drawer has gift bags, but no matter what angle I took the picture...it looked "messy"...even though it was completely organized. So I opted out of including it! :)

Tuesday, July 28, 2009

DIY: Nailhead Trim Upholstered Headboard


Williams Sonoma Home: Gramercy Headboard
Price Tag: $1,250 - $2,650


Williams Sonoma Home: Sutton Bed
Price Tag: $2,250 - $8,650


Chopsticks & Pearls DIY Weekend Project
Price Tag: $60

I'm not gonna lie. I'm pretty impressed with how this project came out. We got a new queen size mattress in June for our guest bedroom. I've been looking EVERYWHERE for a headboard that comes lower than the window sill and have had no luck! So...with nothing on the books last weekend, I decided I would try and make my own.

Step 1: Purchase your supplies & measure your ideal headboard size

Supply List:
2 Yards of Fabric (will work for any size headboard). Of course, I loved an expensive fabric. Make sure and look for coupons before you shop. I found a 40% off coupon online!)
Nailhead Trim Kit - Make sure and buy the "kit" and not the individual nailheads. Trust me. I learned the hard way this weekend. It's MUCH easier to nail every 4 nails.
Plywood - If you want to make a square headboard, most hardware stores will cut the exact size you need. If you want to make rounded edges and your husband is anything like mine, you might need to ask a carpenter or handyman to cut it our. :) I also used a 3/8th inch plywood because I didn't want to drill holes in the wall to hang..I wanted something light. You can get a much thicker plywood (1 1/2 inch) if you want a sturdier look.
Mallet - I would use a mallet over a hammer because a hammer can dent the look of the nailheads
Batting - I purchase two yards of standard batting from the fabric store.
Staple Gun - I had this already!
Picture Hanging Kit - I used a 30 pound picture hook to mount the headboard on the wall.
Wire Cutters - To cut the nailhead trip and picture wire
Screwdriver

2. Step Two: Iron your fabric!!!! Don't be lazy and skip this step! Surely, I don't have to show a picture.....surely.
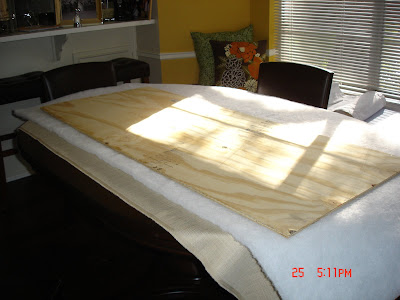


3. Step Three: Use a staple gun to attach the fabric and batting to the plywood. Make sure you pull the fabric pretty tight around the edges.


4. Step Four: Hammer the nailheads around the headboard. I did this on our dining room table and used a quilt to protect the table from any scratches etc. Also, the nailheads can be sharp....especially when you cut the ends. Make sure you don't cut yourself. If so, use a bandaid - you don't want to get blood on the fabric. Trust me on this one......


The picture below is when I tried to nail each nailhead individually....huge mistake! It took forever and it wasn't in a straight line. After all those mission trips in college building houses and hammering nails, I STILL a bad nail hammer-er.


Thank goodness for nailhead trim!!!!


5. Step Five: Attached picture wire to the back of your headboard. I didn't have to use a drill for these screws. I was able to push them through with a screwdriver. Yes - I realize I need a new camera.


6. Hang your headboard and admire your hard work!!!!


My plan is to get a new white coverlet for this bed, two white shams, and one or two green decorative pillows. I'm going to eventually change out these old side tables for a darker wood look to match everything else in our house!

Now..not only do I have a new headboard for our guest room, but I have money left to spend on another surprise project next weekend! Stay tuned!

Wednesday, July 23, 2008

Project #1 (of 3)

Yesterday I found the most fabulous fabric store in Austin. It’s not huge, but they have unique fabrics at unbelievable prices….Fanny’s Fabrics on South Lamar. I went on my lunch break to look for a bright red pattern to re-cover my dining room chairs…and I left with something completely different! A whole new look! I fell in love with so many patterns that I even bought a yard or two of a random fabric to use for pillows or a table runner…who knows!

Before I show you the pictures….keep in mind that I’m trying to brighten up the room and give it a fresh look. Our front room is really long and narrow and doesn’t get much natural light.

The room before with the ugly chair fabric:

My new subtle, but fresh make-over:

Room views: I'm still playing around with the table decoration!

Look #1: Clean and Simple (I think I like this the best!)

Look #2: A simple runner (that I would definately iron)


Look #3: Playing with the colors...might be too springy!


Okay..I know what you are thinking. It’s completely different from my typical taste and doesn’t match my china (that I will eventually bring down from my parents house), but I just loved the pattern and the “shabby chic” look! James wasn’t the biggest fan of all the pink, but I know it will grow on him. I kept re-assuring him that it’s easy to un-do…and that you can barely see the pink when the chairs are pushed in.

Originally, I was going to make little seat covers that would just lie over the seat cushion until I figured out how easy it was to actually recover them. I just unscrewed four screws holding the seat cushion to the chair, used a staple gun to attach the fabric, and re-screwed the seat back on the chair. Super easy! ~10 minutes/chair and I only used two yards of fabric.

Now that I know it’s so easy…I might just change them out all the time! Once we get a china cabinet, I’ll probably go to a more formal look and change them out again! But for now..I thought this would be fun!